
A van electrical system stores energy in a separate house battery, accepts energy from one or more charging sources, and distributes protected power to lights, a refrigerator, fans, outlets, and other loads. For a beginner, the safest place to start is not a shopping list. Start by identifying what you want to power, how long you expect to use it, and how you will recharge the battery.
How a Van Electrical System Works
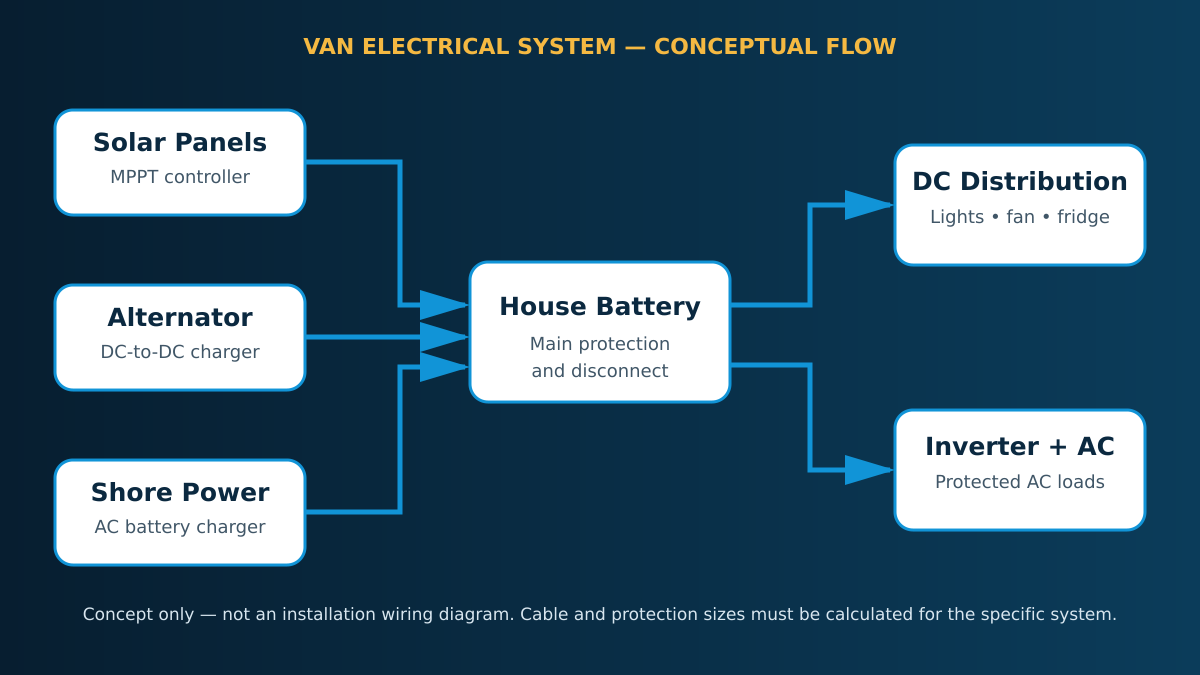
A basic system has three jobs:
- Charge: solar panels, the vehicle alternator through a DC-to-DC charger, or shore power add energy.
- Store: a house battery holds energy for later use.
- Distribute: protected DC and, when needed, AC circuits deliver power to appliances.
The vehicle’s starter battery and the camper’s house battery normally serve different purposes. The starter battery supports the vehicle. The house battery supports the living area. A correctly designed charging arrangement connects these systems only through suitable equipment rather than treating them as one unmanaged battery bank.
12V DC and 120V AC: What Is the Difference?
Most US van builds use a low-voltage DC house system—commonly 12 volts—for loads such as lights, ventilation fans, water pumps, USB outlets, and many refrigerators. DC loads can operate without an inverter, which avoids an extra conversion stage.
Household-style outlets in the United States use 120-volt AC. An inverter converts battery DC into AC for compatible appliances. The appliance wattage, startup surge, inverter limits, battery voltage, cable capacity, and protection all affect whether a load can be supported safely. An inverter should therefore be sized from actual loads rather than selected only because a larger number appears more capable.
Main Components of a Camper Van Electrical System
House battery
The house battery is the energy-storage center of the system. Common options include lithium iron phosphate (LiFePO4) and lead-acid designs such as AGM. These chemistries have different charging requirements, usable capacity, temperature limitations, weight, service life, and cost. Follow the battery manufacturer’s limits and use charging equipment with a compatible profile.
Solar panels and solar charge controller
Solar panels produce variable DC output. A solar charge controller regulates that output for the battery. An MPPT controller is common in modern van systems, but its voltage, current, temperature, and battery-profile limits must match the panel array and battery. Solar production changes with season, latitude, shade, weather, panel angle, and temperature, so a panel’s nameplate wattage is not a promise of daily energy.
DC-to-DC charger
A DC-to-DC charger uses alternator energy while the engine is running and applies a controlled charging profile to the house battery. Its input and output limits must be compatible with the vehicle charging system, battery, wiring, and protection. Modern vehicles may use variable-voltage or “smart” alternators, making manufacturer guidance especially important.
Shore-power charger or inverter/charger
Shore power lets the van connect to an external AC supply. A battery charger converts that AC input into controlled DC charging. An inverter/charger combines charging and inverter functions and may include transfer switching. Shore-power inlets, grounding, bonding, overcurrent protection, leakage protection, and AC distribution are code-sensitive parts of the design and should be reviewed by a qualified professional.
Inverter
An inverter supplies AC power from the house battery. Decide whether AC power is genuinely necessary before adding one. Many everyday loads have efficient DC alternatives. When an inverter is required, compare continuous output, surge capability, waveform, idle consumption, input-voltage range, environmental rating, and the manufacturer’s installation requirements.
Busbars, fuse blocks, breakers, and disconnects
Distribution components organize current paths and allow circuits to be protected and isolated. A fuse or circuit breaker is primarily selected to protect the conductor and the circuit within the equipment manufacturer’s limits. Smaller branch conductors generally need protection appropriate to their own capacity. A main disconnect provides a controlled means to isolate the battery, but its location and rating must suit the system.
Battery monitor
A shunt-based battery monitor measures current entering and leaving the battery and estimates state of charge when configured correctly. Battery voltage alone can be misleading, particularly while charging or under load. A monitor is useful for learning real daily consumption and checking whether the charging plan is adequate.
Plan Loads Before Buying Components
Create an energy audit listing every device, its rated power, and expected daily operating time. Energy is calculated as:
Energy (Wh) = Power (W) × Time (hours)
For example, a 40-watt device used for five hours represents 200 watt-hours of idealized daily energy: 40 × 5 = 200 Wh. This is a planning value, not a final system size. Conversion losses, standby consumption, temperature, battery limits, wiring losses, and real operating cycles must also be considered.
For devices labeled in amps, an initial DC estimate can use:
Power (W) = Voltage (V) × Current (A)
Use manufacturer specifications or measured consumption whenever possible. Do not assume that a device always draws its maximum label rating or that it will run continuously.
Choose Charging Sources Around Real Travel
There is no single best charging mix for every van:
- Solar can be useful during stationary off-grid use, but shade and winter conditions reduce output.
- Alternator charging can suit people who drive regularly, subject to vehicle and alternator limits.
- Shore power provides a dependable option when campsites or household connections are available and the installation is designed for them.
Two suitable charging methods can provide resilience, but redundancy should not be added without checking the battery’s maximum charge current and the combined output of simultaneous chargers.
Why Wire and Fuse Sizes Cannot Be Copied From a Generic Diagram
Wire selection depends on current, circuit length, allowable voltage drop, conductor material and insulation, ambient temperature, bundling, routing, terminal ratings, and applicable standards. Fuse selection also depends on conductor ampacity, equipment limits, fault-current capability, interrupt rating, and fuse type. A diagram from another build does not prove that the same sizes are safe in yours.
Blue Sea Systems’ circuit-protection guidance explains that conductors need appropriate overcurrent protection and that the protection device must be sized for the wire it protects. Victron’s van documentation likewise directs installers to calculate cable sizes for the specific project rather than using one universal value.
A Beginner-Friendly Planning Sequence
- List DC and AC loads and estimate daily watt-hours.
- Decide how many days of autonomy you need.
- Select a battery chemistry and capacity within its documented limits.
- Choose realistic solar, alternator, and shore charging sources.
- Decide whether an inverter is necessary and identify its real loads.
- Create a project-specific single-line diagram.
- Calculate every conductor and protection device.
- Check ventilation, temperature, moisture, vibration, access, and serviceability.
- Have the design reviewed before installation.
- Inspect and test the completed system before connecting loads.
Common Beginner Mistakes
- Buying batteries and an inverter before completing an energy audit.
- Treating solar nameplate wattage as guaranteed daily production.
- Using a copied diagram without recalculating cables and protection.
- Protecting equipment while forgetting that fuses also protect conductors.
- Ignoring inverter standby consumption or appliance startup surge.
- Mixing incompatible battery and charger settings.
- Routing cables where heat, abrasion, moisture, or vibration can damage them.
- Attempting shore-power or AC distribution work without appropriate expertise.
Frequently Asked Questions
Do I need solar panels in my van?
No. Solar is one charging option, not a requirement. Your answer depends on daily energy use, driving frequency, parking conditions, climate, roof space, and access to shore power.
Can a van run only on 12V DC?
Yes, if every required load has a compatible DC option and the system is designed for it. Avoiding AC can simplify a build, but appliance availability and individual needs determine whether it is practical.
How large should my battery be?
It cannot be determined from vehicle size alone. Calculate daily energy use, desired autonomy, battery usable-capacity limits, temperature effects, charging opportunities, and reserve margin.
Is a wiring diagram enough to install the system?
No. A useful design also needs calculated conductor and protection sizes, equipment manuals, terminal specifications, routing details, grounding and bonding decisions, installation standards, and a commissioning plan.
Should a beginner install 120V AC wiring?
AC work carries serious shock and fire hazards and is subject to code and product requirements. If you are not qualified to design, install, and test it, use a qualified RV electrician.
Final Takeaway
A dependable van electrical system begins with an energy audit and a clear flow: charging sources feed a protected house battery, then protected DC and AC distribution serves the loads. Learn the function of each component before selecting products, calculate rather than copy wire and fuse sizes, and obtain qualified review for safety-critical work.
Technical References
- Victron Energy: US Van Manual and System Drawing
- Blue Sea Systems: Circuit Protection
- Blue Sea Systems: DC Main Power Distribution
- RV Industry Association: NFPA 70 Articles for RV Electrical Systems
Last technical review: September 1, 2026. Van Volt Pro has not presented this guide as hands-on testing or professional electrical advice.