
A camper van inverter lets the house battery system run equipment designed for household AC power. It converts low-voltage DC power from the house battery bank into 120-volt AC power for devices such as laptop chargers, kitchen appliances, tools, and some induction cooktops.
Choosing one is not as simple as buying the largest wattage you can afford. The inverter must suit the appliances you expect to run, their startup surge, the battery bank’s discharge capability, the system voltage, and the way shore power will be handled. An oversized inverter can add cost and standby consumption without improving a poorly matched battery system. An undersized model may shut down when a load starts.
This guide explains the decisions a beginner should make before selecting an inverter. It is an educational planning guide, not a universal wiring or installation specification.
Safety note: Inverters connect high-current DC equipment to potentially lethal AC voltage. Cable size, overcurrent protection, grounding, bonding, transfer equipment, mounting clearances, and AC distribution must follow the inverter manufacturer’s instructions and the standards applicable to the vehicle. Have a qualified professional review the design when required.
What an Inverter Does in a Camper Van
Most van house batteries store DC energy, commonly in a 12-volt or 24-volt system. Many efficient van loads—including lighting, fans, refrigerators, pumps, and USB chargers—can operate directly from DC power. An inverter is needed only for equipment that requires AC power.
The basic energy path is:
House battery → DC protection and disconnect → inverter → AC protection/distribution → AC appliance
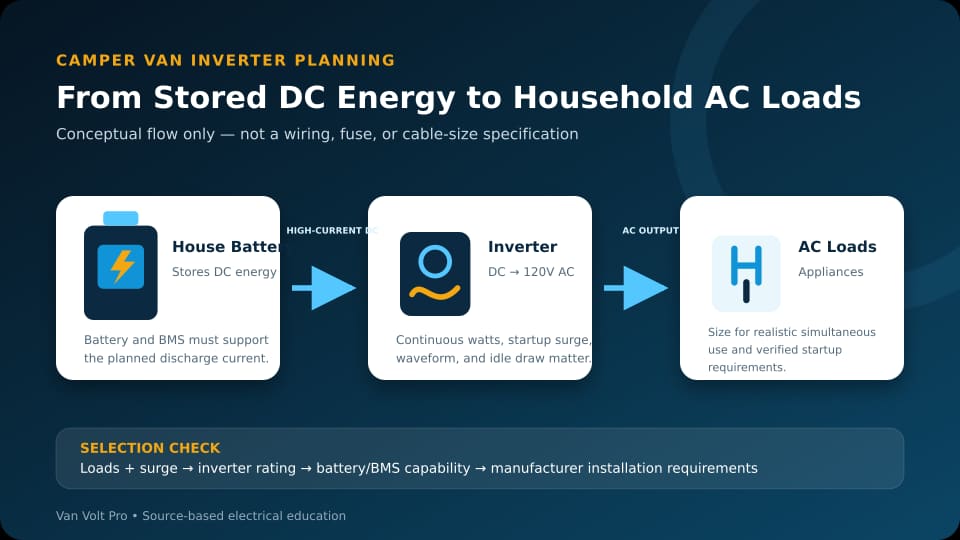
Solar panels do not normally power the inverter directly. Solar, alternator charging, and shore charging replenish the battery bank; the battery supplies the inverter. This distinction matters because a large solar array does not compensate for a battery or battery-management system that cannot safely deliver the inverter’s required current.
For a beginner-level overview of the complete system, start with the van electrical system guide. The camper van electrical wiring diagram explanation shows where the inverter sits relative to charging sources, protection, and loads.
Step 1: Decide Whether You Need an Inverter
Before sizing an inverter, list every appliance you expect to run. Separate the list into DC and AC loads.
Whenever a practical DC version of a device exists, operating it directly from the house battery can avoid conversion losses and inverter idle consumption. This does not mean every appliance must be DC. It means the inverter should be selected around genuine AC requirements rather than used as the default power path for the whole van.
Typical AC loads may include:
- laptop power adapters;
- camera or tool-battery chargers;
- a microwave;
- an induction cooktop;
- a blender, coffee maker, or other kitchen appliance;
- equipment that has no suitable DC alternative.
Resistance space heaters, water heaters, and air conditioners can demand substantial energy. An inverter wattage rating alone does not make these loads practical. Their daily energy consumption, battery capacity, charging sources, and operating time must be evaluated separately.
Step 2: Calculate the Highest Simultaneous Continuous Load
An inverter’s continuous rating is the power it can supply under specified conditions. Start with the input or rated wattage shown on each appliance label, manual, or manufacturer specification sheet.
Do not simply add every appliance in the van. Add the AC appliances that could realistically operate at the same time.
For example:
| Simultaneous AC load | Rated power |
|---|---|
| Laptop charger | 100 W |
| Coffee grinder | 200 W |
| Induction cooktop at selected setting | 1,200 W |
| Planning total | 1,500 W |
The example establishes a 1,500-watt simultaneous continuous load before allowance for operating conditions or future changes. It does not automatically prescribe a particular inverter. Ratings, temperature derating, power factor, and manufacturer guidance still matter.
An appliance’s marketing category is not a reliable wattage source. Two microwaves or cooktops of similar size can have different input requirements. Use the actual model’s input specification, not only its advertised cooking output.
Step 3: Check Startup and Surge Power
Some loads draw more power when starting than during normal operation. Motors, compressors, pumps, microwave transformers, and certain power tools can have a brief startup demand.
Inverter specifications may list continuous power and peak or surge power, but surge ratings are not directly comparable unless their duration and test conditions are also known. A high peak number for a fraction of a second may not start a load that needs elevated power for longer.
For every demanding appliance:
- check its manual or manufacturer data for startup requirements;
- compare those requirements with the inverter’s surge magnitude and duration;
- confirm that the battery and BMS can support the corresponding DC-side demand;
- ask the inverter manufacturer when the appliance data is incomplete.
Avoid assuming that a nominal “2,000-watt” inverter can run every appliance below 2,000 watts. Waveform, surge behavior, temperature, battery voltage, cable voltage drop, and protective limits can all affect the result.
Step 4: Choose Pure Sine Wave or Modified Sine Wave
For a new camper van system, a pure sine wave inverter is generally the more compatible choice. It produces an AC waveform intended to resemble utility power more closely than a modified sine wave unit.
Modified sine wave models may cost less, but some motors, chargers, audio equipment, control electronics, and other devices can run noisily, inefficiently, unpredictably, or not at all. Compatibility must be confirmed by the appliance manufacturer.
A pure sine wave label is not by itself proof of overall quality. Also compare:
- continuous and surge ratings;
- low-voltage shutdown behavior;
- efficiency across realistic loads;
- no-load or standby consumption;
- operating-temperature limits;
- safety certifications relevant to the product and market;
- warranty, documentation, and technical support.
Step 5: Match the Inverter to the Battery Bank and BMS
The AC wattage has to come from the DC battery side, with additional input required because conversion is not perfectly efficient.
A useful planning relationship is:
Approximate DC current = AC load watts ÷ (battery voltage × inverter efficiency)
If a 1,500-watt AC load were supplied from a 12-volt system at an assumed 90% conversion efficiency, the simplified estimate would be:
1,500 ÷ (12 × 0.90) ≈ 139 amps
This is an illustration, not a cable or fuse specification. Actual battery voltage changes with chemistry, state of charge, load, and system conditions. Inverter efficiency also varies by product and load.
The battery bank must be able to supply the required current without exceeding:
- the battery manufacturer’s continuous and peak discharge limits;
- the BMS continuous and surge limits;
- the permitted operating-temperature range;
- the inverter’s acceptable DC input-voltage range;
- the limits of the designed conductors, connections, disconnects, and protective devices.
This is why a large inverter paired with a small battery is not automatically a capable system. A BMS may disconnect under excessive load, while voltage drop can make an inverter shut down even when the battery still contains energy.
Step 6: Choose the Correct DC System Voltage
The inverter’s DC input voltage must match the house battery system. A 12-volt inverter belongs on a nominal 12-volt battery system; a 24-volt inverter belongs on a nominal 24-volt system.
At the same power, increasing system voltage reduces current. That can be useful in higher-power installations, but changing to 24 volts affects charging equipment, DC distribution, monitoring, and any 12-volt loads. Voltage choice is a system-level decision, not an isolated inverter upgrade.
Never connect an inverter to a battery voltage outside its specified input range.
Step 7: Decide Between an Inverter and an Inverter/Charger
A stand-alone inverter converts battery DC into AC. An inverter/charger can also use an external AC source—such as shore power or a compatible generator—to charge the house battery. Many models include an internal transfer function that supplies connected AC loads from the external source when it is available.
A stand-alone inverter may suit a system that:
- has few AC loads;
- uses a separate shore charger;
- does not need automatic AC source transfer;
- prioritizes a simpler or lower-cost component layout.
An inverter/charger may suit a system that:
- regularly connects to shore power;
- needs coordinated charging and AC transfer;
- benefits from configurable shore-current limits;
- is being designed as an integrated AC system.
Confirm the charger settings support the battery chemistry and manufacturer limits. Also verify transfer-switch behavior, neutral-to-ground switching or bonding requirements, and compatibility with the intended AC distribution design. These details are model- and jurisdiction-specific.
Step 8: Compare the Features That Affect Daily Use
Two inverters with the same headline wattage can behave very differently. Compare the following features.
Idle and Search-Mode Consumption
An inverter consumes power while switched on even when no AC appliance is operating. In a small battery system, daily standby energy can matter. A low-power search or eco mode may reduce consumption, although some small or intermittent loads may not reliably wake the inverter.
Remote On/Off Control
If the inverter is mounted in an electrical compartment, a compatible remote switch or control panel can prevent the user from crawling into the compartment. Use only the manufacturer-approved control method; do not extend a high-current circuit to create a remote switch.
Cooling and Noise
Inverters produce heat and may use fans. Check the manufacturer’s required clearances, orientation, ventilation, moisture restrictions, and temperature derating. Do not box an inverter into an unventilated space. Victron’s US van documentation, for example, emphasizes dry, ventilated mounting and specified clearance around the unit.
Outlets or Hardwired AC Output
Small inverters may have built-in receptacles. Larger units may be designed for a hardwired AC distribution system. A hardwired system introduces additional requirements for breakers, receptacles, grounding, bonding, transfer equipment, and protection such as GFCI where applicable.
Documentation and Support
Good documentation should explain installation orientation, DC protection, conductor requirements, grounding, AC output, environmental limits, shutdown behavior, and fault codes. Treat missing or vague safety documentation as a selection concern.
Common Inverter-Sizing Mistakes
Buying the Largest Inverter “for Future-Proofing”
Future capacity can be useful, but the battery, BMS, charging system, cables, protection, and AC distribution must be designed for it. A larger nameplate does not create more stored energy.
Using Appliance Output Watts Instead of Input Watts
A microwave’s cooking output can be lower than the electrical input it draws. Use the input rating from the appliance label or manual.
Ignoring Simultaneous Loads
A cooktop and water appliance may each work alone but overload the inverter when operated together. Document which combinations the system is intended to support.
Ignoring Surge Duration
Compare both the amount and duration of startup demand with the inverter specification.
Sizing Only the Inverter
The battery’s discharge rating and BMS limit are part of the same decision. The complete DC path must support the design current safely.
Treating an Inverter as an Energy Source
An inverter converts energy; it does not generate or store it. Battery capacity and charging must support the planned watt-hours of use.
A Beginner’s Inverter Selection Checklist
Before choosing a model, record:
- every AC appliance and its actual input wattage;
- the highest realistic combination of simultaneous loads;
- startup or surge requirements and duration;
- pure sine wave compatibility requirements;
- the house battery’s nominal voltage;
- battery and BMS continuous and peak discharge limits;
- expected inverter idle consumption;
- whether shore charging and automatic transfer are needed;
- mounting, ventilation, moisture, and temperature constraints;
- the manufacturer’s DC protection, grounding, and AC-distribution requirements;
- professional or regulatory review required for the final design.
Frequently Asked Questions
What size inverter is best for a camper van?
There is no universal best size. Determine the highest simultaneous continuous AC load, check startup surge, then confirm the battery, BMS, and complete DC path can support the inverter. Select from manufacturer ratings rather than copying another van’s wattage.
Is a 2,000-watt inverter enough for a camper van?
It may be enough for some systems, but the answer depends on the actual appliances and which ones run together. It can be excessive for a van that only charges laptops, or insufficient for certain combinations of cooking and heating loads.
Do I need a pure sine wave inverter?
Pure sine wave is generally the more compatible option for a new build, especially when powering equipment with motors, chargers, audio components, or electronic controls. Confirm requirements with each appliance manufacturer.
Can solar panels run an inverter directly?
In a typical camper van system, the battery supplies the inverter while solar charging replenishes the battery through a charge controller. The complete system must be designed around both instantaneous power and daily energy use.
Does a larger inverter drain the battery faster?
Battery use is primarily driven by the connected load and conversion losses, but larger inverters can have higher idle consumption. An oversized inverter also permits loads that may deplete a small battery quickly.
Can I install an inverter myself?
DIY planning does not remove electrical risk. High-current DC faults can cause fire, and AC output can cause shock or electrocution. Follow the exact manufacturer instructions and applicable standards, and use a qualified professional where the design, installation, or inspection exceeds your competence or local requirements.
Final Takeaway
Choose a camper van inverter as part of the complete electrical system. Start with real appliance input ratings and simultaneous use. Check surge behavior, select a compatible waveform, and verify that the battery and BMS can deliver the required current. Then decide whether shore-power charging and transfer justify an inverter/charger.
The best inverter is not necessarily the largest. It is the model whose documented limits match the loads, battery system, installation environment, and safety design of the van.
Technical References
- Victron Energy — US van system manual and drawing
- Victron Energy — MultiPlus-II 120V manual
- Blue Sea Systems — Choosing wire size for a DC circuit
- Blue Sea Systems — Selecting a fuse and fuse holder
- Blue Sea Systems — Grounding and circuit protection for inverters and chargers
Continue learning in our Van & RV Electrical guides.
A camper van inverter must be matched to the battery bank, maximum DC current, cable length, overcurrent protection, ventilation, and expected AC loads.