A camper van inverter turns your house battery’s low-voltage DC into 120-volt AC, so you can run things built for a wall outlet: laptop chargers, kitchen appliances, tools, and some induction cooktops. Choosing one isn’t a matter of buying the biggest wattage you can afford. It has to suit the appliances you’ll actually run, their startup surge, what your battery can deliver, and how shore power fits in. Oversize it and you pay more and waste standby power. Undersize it and it shuts off when a load kicks in.
This guide walks through the decisions a beginner should make before picking one. It’s a planning guide, not an installation spec.
Safety note: An inverter connects high-current DC equipment to AC voltage that can kill. Cable size, fusing, grounding, bonding, transfer equipment, mounting clearances and AC distribution must follow the inverter maker’s instructions and the standards that apply to your vehicle. Have a qualified professional review the design where required.
What the inverter does in a van
Most van house batteries store DC power, usually at 12 or 24 volts. Plenty of efficient van loads, such as lights, fans, fridges, pumps and USB chargers, can run straight from DC. You only need an inverter for gear that truly needs AC.
The power path is: house battery → DC protection and disconnect → inverter → AC protection and distribution → appliance.
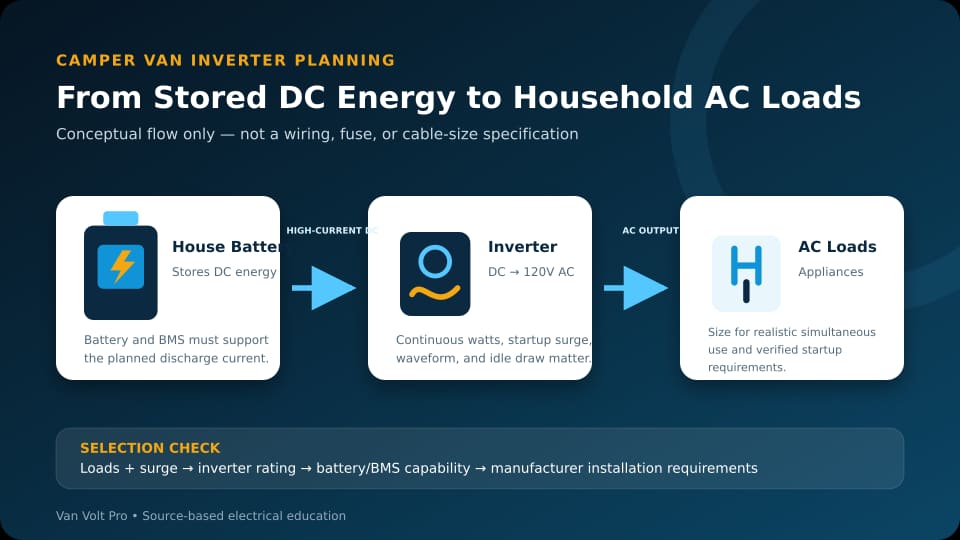
Solar doesn’t normally feed the inverter directly. Solar, the alternator and shore power refill the battery, and the battery feeds the inverter. That matters because a big solar array can’t make up for a battery or BMS that can’t safely deliver the inverter’s current. For the whole picture, see the van electrical system guide, and the wiring diagram walkthrough shows where the inverter sits.
Step 1: Decide whether you need one
List every appliance you expect to run and split them into DC and AC. If a practical DC version exists, running it straight from the battery avoids conversion losses and inverter idle draw. The inverter should be sized around true AC needs, not used as the default path for the whole van.
Typical AC loads: laptop adapters, camera or tool-battery chargers, a microwave, an induction cooktop, a blender or coffee maker, and anything with no decent DC version. Space heaters, water heaters and air conditioners are a different story. An inverter’s wattage rating alone doesn’t make them practical; their daily energy use, battery size and charging have to be worked out separately.
Step 2: Find your highest simultaneous load
Don’t add up every appliance in the van, just the ones that could run together. Use the input wattage on the appliance label or manual, not the marketing category.
| Loads running together | Rated power |
|---|---|
| Laptop charger | 100 W |
| Coffee grinder | 200 W |
| Induction cooktop at your usual setting | 1,200 W |
| Planning total | 1,500 W |
That’s a 1,500 W simultaneous load before any allowance. It doesn’t pick a specific inverter for you, because ratings, temperature derating and the maker’s guidance still apply. A microwave’s cooking output is lower than the electricity it draws, so always use the input rating.
Step 3: Check startup surge
Motors, compressors, pumps, microwave transformers and some power tools pull extra power for a moment when they start. Inverter specs list a continuous rating and a peak or surge rating, but surge numbers aren’t comparable unless the duration and test conditions are given. A big peak for a fraction of a second may not start a load that needs elevated power for longer.
For each demanding appliance, check its manual for startup needs, compare them with the inverter’s surge level and duration, and make sure the battery and BMS can support the matching DC-side demand. If the appliance data is incomplete, ask the inverter maker. And don’t assume a “2,000 W” inverter runs everything under 2,000 W: waveform, temperature, battery voltage, cable drop and protective limits all play a part.
Step 4: Pure sine wave or modified?
For a new build, pure sine wave is generally the more compatible choice because its waveform is closer to utility power. Modified sine wave units can be cheaper, but some motors, chargers, audio gear and electronics run noisily, inefficiently or not at all on them. A pure sine label doesn’t guarantee quality, though. Also compare continuous and surge ratings, low-voltage shutdown behavior, efficiency at realistic loads, standby draw, temperature limits, safety certifications, and warranty and support.
Step 5: Match it to the battery and BMS
The AC watts have to come from the DC side, plus a bit extra because conversion isn’t perfect. A rough planning formula:
DC amps ≈ AC watts ÷ (battery voltage × inverter efficiency)
A 1,500 W load on a 12V system at an assumed 90% efficiency works out to 1,500 ÷ (12 × 0.90) ≈ 139 amps. That’s an illustration, not a cable or fuse spec, since real battery voltage and efficiency change with load and state of charge. As a gut check, a 1,000 W inverter at full load can pull on the order of 100 A from a 12V battery. For cable sizing, start with our 12V wire gauge chart and the fuse sizing calculator, but for inverter feeders always follow the inverter manual first.
The battery has to deliver that current without exceeding:
- the battery maker’s continuous and peak discharge limits;
- the BMS’s continuous and surge limits;
- the permitted operating temperature range;
- the inverter’s acceptable DC input voltage range;
- the limits of the cables, connections, disconnects and fuses you design.
That’s why a huge inverter on a small battery isn’t a capable system. The BMS may cut off under heavy load, and voltage drop can make the inverter shut down while the battery still has energy. If you’re choosing a battery too, see what a LiFePO4 battery is.
Step 6: Get the DC system voltage right
A 12V inverter belongs on a nominal 12V battery system and a 24V inverter on a 24V one. Never connect an inverter to a voltage outside its input range. At the same power, higher voltage means less current, which can help in bigger installations, but moving to 24V also affects chargers, DC distribution, monitoring and your 12V loads. It’s a system-level decision, not a simple inverter upgrade.
Step 7: Inverter or inverter/charger?
A stand-alone inverter just turns battery DC into AC. An inverter/charger can also charge the battery from shore power or a compatible generator, and many include a transfer function that powers your AC loads from that source when it’s connected.
- Stand-alone inverter suits a system with few AC loads, a separate shore charger, no need for automatic transfer, or a simpler, cheaper layout.
- Inverter/charger suits a van that connects to shore power often, needs coordinated charging and transfer, benefits from adjustable shore-current limits, or is designed as an integrated AC system.
Make sure the charger settings support your battery chemistry and the maker’s limits. Also check transfer-switch behavior, neutral-to-ground switching or bonding requirements, and compatibility with your AC distribution plan. These details depend on the model and your jurisdiction.
Step 8: Compare the features you’ll live with
- Idle and search-mode draw. An inverter uses power just by being on. On a small battery that standby energy adds up. A low-power search or eco mode can cut it, though some small or intermittent loads may not wake the inverter.
- Remote on/off. If the inverter lives in a compartment, a compatible remote switch or panel saves you crawling in to flip it. Use only the maker-approved method, and never extend a high-current circuit to build your own remote switch.
- Cooling and noise. Inverters make heat and often have fans. Check required clearances, orientation, ventilation, moisture limits and temperature derating, and don’t box one into an unventilated space. Victron’s US van documentation, for example, stresses dry, ventilated mounting with specified clearance.
- Outlets or hardwired output. Small inverters may have built-in receptacles. Larger ones are often hardwired to AC distribution, which adds requirements for breakers, receptacles, grounding, bonding, transfer equipment and GFCI protection where it applies.
- Documentation and support. Good manuals explain orientation, DC protection, conductor requirements, grounding, AC output, environmental limits, shutdown behavior and fault codes. Vague safety documentation is a red flag.
Quick reference: typical loads and what inverter size means on the battery side
These are typical published ranges, not your appliance’s rating. Wattage varies a lot between models, so read the label on yours.
| Common van load | Typical input power |
|---|---|
| Laptop and phone chargers | about 50 to 100 W |
| Drip coffee maker | about 900 to 1,200 W |
| Microwave oven (input, not cooking watts) | roughly 750 to 1,500 W, depending on the model |
| Blender | roughly 300 to 1,500 W, depending on the model |
| Hair dryer | up to about 1,800 W |
A van that only charges laptops, cameras and phones needs a small inverter. Adding a cooking or kettle-class load moves the requirement toward 1,500 W or more, and the table below shows what that does to the battery side. The numbers use the planning formula from Step 5 with an assumed 90% efficiency and a battery voltage of 12V or 24V.
| Inverter continuous output | DC current at 12V | DC current at 24V |
|---|---|---|
| 300 W | about 28 A | about 14 A |
| 500 W | about 46 A | about 23 A |
| 1,000 W | about 93 A | about 46 A |
| 1,500 W | about 139 A | about 69 A |
| 2,000 W | about 185 A | about 93 A |
| 3,000 W | about 278 A | about 139 A |
To add up your own loads, use the Van & RV Power System Simulator.
Common mistakes
- Buying the biggest one “to future-proof.” A bigger nameplate doesn’t create more stored energy, and the battery, BMS, charging, cables, protection and AC distribution all have to be designed for it.
- Using appliance output watts instead of input watts. Read the label.
- Ignoring simultaneous loads. A cooktop and a water appliance may each work alone and overload the inverter together. Write down which combinations the system is meant to support.
- Ignoring surge duration. Compare both how much and how long.
- Sizing only the inverter. The battery’s discharge rating and BMS limit are part of the same decision.
- Treating an inverter as an energy source. It converts energy, it doesn’t make or store it. Battery capacity and charging have to cover your planned watt-hours.
Before you choose, write down
- every AC appliance and its actual input wattage;
- the highest realistic set of simultaneous loads;
- startup surge and how long it lasts;
- whether you need pure sine wave;
- your house battery’s nominal voltage;
- battery and BMS continuous and peak discharge limits;
- expected inverter idle draw;
- whether you need shore charging and automatic transfer;
- mounting, ventilation, moisture and temperature constraints;
- the maker’s DC protection, grounding and AC distribution requirements;
- any professional or regulatory review the final design needs.
Common questions
What size inverter is best for a camper van?
There’s no universal size. Find your highest simultaneous continuous AC load, check startup surge, then confirm the battery, BMS and entire DC path can support the inverter. Choose from maker ratings, not from another van’s wattage. For example, a 65 W laptop charger plus a 1,000 W coffee maker running together is about 1,065 W, so a 1,500 W inverter leaves some margin. Then check its surge rating and your battery’s discharge limit, and see the quick reference table above for what that size means in DC amps.
Is a 2,000-watt inverter enough?
For some systems, yes. It depends on the actual appliances and which run together. It can be overkill for a van that only charges laptops, and not enough for certain cooking-plus-heating combinations.
Do I need pure sine wave?
Generally yes for a new build, especially with motors, chargers, audio gear or electronic controls. Confirm with each appliance maker.
Can solar panels run an inverter directly?
In a typical van system, the battery feeds the inverter and solar recharges the battery through a charge controller. Design for both instantaneous power and daily energy use. Our solar charge controller calculator covers the charging side.
Does a bigger inverter drain the battery faster?
Battery use is mostly driven by the connected load and conversion losses, but larger inverters often have higher idle draw. An oversized one also lets you run loads that can flatten a small battery quickly.
Can I install an inverter myself?
DIY planning doesn’t remove the risk. High-current DC faults can cause fires, and AC output can cause shock or electrocution. Follow the exact maker instructions and applicable standards, and use a qualified professional where the design, installation or inspection is beyond your skills or local rules.
The takeaway
Choose the inverter as part of the whole electrical system. Start with real input ratings and what runs together, check surge behavior, pick a compatible waveform, and confirm the battery and BMS can deliver the current. Then decide whether shore charging and transfer justify an inverter/charger. The best inverter isn’t the biggest one; it’s the one whose documented limits match your loads, battery, installation space and safety design.
Technical references
- Victron Energy: US van system manual and drawing
- Victron Energy: MultiPlus-II 120V manual
- Blue Sea Systems: Choosing wire size for a DC circuit
- Blue Sea Systems: Selecting a fuse and fuse holder
- Blue Sea Systems: Grounding and circuit protection for inverters and chargers
- Virginia Tech Cooperative Extension: Estimating appliance and home electronic energy use
Last updated: October 30, 2026. General educational information. It doesn’t replace manufacturer instructions, electrical code requirements or advice from a qualified electrician.